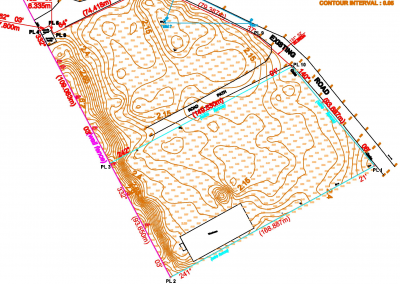
To work with 3D data in ArcGIS Pro, you need to: import your 3D data (like 3D models or point clouds) using the “Import 3D Files” tool, then create a new 3D scene, add the imported data as a layer, and manipulate its appearance and properties within the scene view to visualize and analyze your 3D data; you can also create 3D object feature classes directly within ArcGIS Pro to model features in 3D space.
Key steps:
- Enable 3D Analyst extension: To access advanced 3D functionalities, make sure the “3D Analyst” extension is enabled in your ArcGIS Pro license.
- Import 3D data:
- Go to the “Analysis” tab.
- Select “Tools” > “Import 3D Files”

- Browse to your 3D data file (supported formats include .obj, .dae, .fbx).
- Choose an output location to store the imported data as a multipatch feature class.
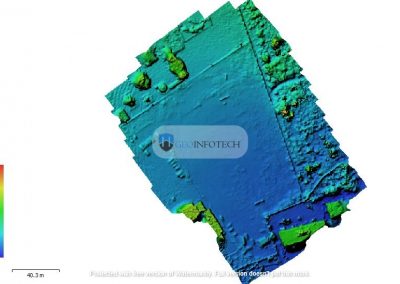
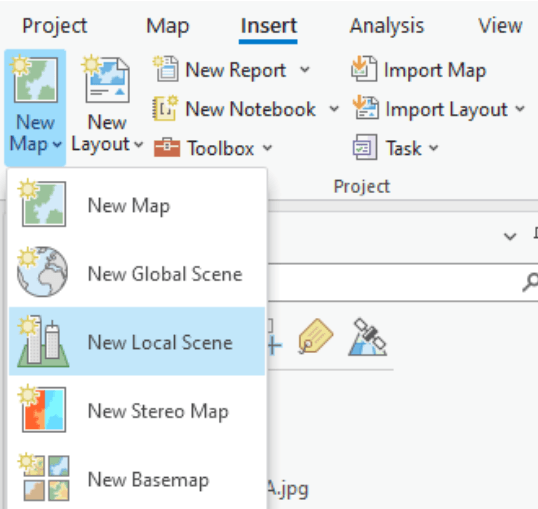
3. Create a 3D Scene: To create a new 3D scene in ArcGIS Pro,
- Go to the “Insert” tab
- Click the “New Map” tab.
- Select “New Scene” to create a new 3D view.
You can select “New Local Scene” to start a new 3D scene; you can also choose “New Global Scene” for a global perspective view of the Earth.
4. Add 3D data as a layer: In the “Contents” pane, drag and drop your imported 3D data layer into the scene.
5. Manipulate 3D visualization:
- Camera controls: Use the navigation tools in the scene view to rotate, pan, and zoom.
- Symbology: Customize the appearance of your 3D data by adjusting color, transparency, and other visual properties.
- Vertical exaggeration: Enhance the vertical dimension of your data by adjusting the vertical exaggeration setting.
- Slice and profile views: Create cross-sections or profiles through your 3D data to analyze specific features.